Late last year, I replaced my main desktop PC, after using it for just about 7 years – a pretty good run. I decided to just buy an off-the-shelf system from Dell, rather than build my own (which I have done many times in the past), since my current computing needs are not super unusual, and it didn’t seem like it would be worth spending the time to spec everything out and do all of my normal bargain hunting behavior for it. Even though I have several other usable computing devices around the house which could step in when necessary, I opted for the enhanced service contract on my new machine, thinking that, in the event that something did break, minimizing my downtime would be worth the expense.
Well, for once, something actually broke, when I purchased an extended warranty! After a couple of months of service, a fan on the computer started rattling intermittently. This is always an unnerving thing to hear, because you immediately think that your CPU or GPU is turning into a mini hot plate inside your case, and that a meltdown might be imminent. After popping the cover, inspecting and listening to all of the fans, and making sure that there was nothing rubbing up against any of the fans, I realized that the noise (which was becoming more frequent and louder) was coming from the fan enclosed in the power supply. Since the power supply is pretty much the one non-user serviceable part in the case, I relented and contacted support about getting a replacement for it. After doing the usual “I have investigated this and I’m not a total dummy” dance with technical support, they informed me that replacing just the power supply alone would be delayed for several weeks, as the part was backordered. However, they could ship me a replacement system much sooner than that – would I like to do that, instead? Sure, I guess! They shipped the replacement system via overnight shipping, and the next day, the box was sitting in my living room, waiting to be opened.

Source: File:Intel 512G M2 Solid State Drive.jpg – https://en.wikipedia.org David290, CC BY-SA 4.0, via Wikimedia Commons
Having used my new desktop for a couple of months, I had, naturally, already installed a bunch of things, and accumulated various stuff (not subject to cloud backups) which I would be loathe to simply throw away. If I had to reinstall and reconfigure things, I was probably looking at a couple of days of work before things were truly back to normal. Ideally, I would be able to just swap out the drives from my machine into the replacement, and go on my merry way, but I was wary about whether or not it would work that smoothly. I checked on the shipping invoice, and confirmed that they had sent a system with identical specs and hardware as my original PC, which was promising with regards to being able to just swap out the drives. (The warranty e-mails suggested that they would ship something that was equivalent or better, so I was curious as to whether or not I would get a free upgrade.) I decided to give it a shot, since if it didn’t work, I probably wouldn’t lose that much time compared to doing a full reinstall.
This PC Magazine article gave me some optimism that things would just work, especially since, as far as I could tell, the new hardware was identical to the old set. And it turns out that the drive swap was successful, but I did run into a couple of issues that had to be resolved, which I figured I would document here, in case anyone else on the Internet runs into something similar.
BitLocker Recovery Keys
My drives were encrypted with BitLocker drive encryption, with the key stored in the TPM on the computer. When I moved the drives to a new computer, without the keys in its TPM, I had to enter the appropriate recovery keys at boot time, in order to be able to use the drives. I had the keys backed up somewhere on network storage, but I found it easier to simply look them up on my phone, from my Microsoft account at aka.ms/myrecoverykey.
Reactivating Windows
Windows fingerprints your system’s hardware upon activation. Even though the hardware in the replacement system was the same, elements that are used in the system fingerprint such as its MAC address can change, resulting in the OS activation check failing. To reactivate using the same key as on your old system, you can follow the directions in this article.
Hitting the active device limit for the Windows Store
It just so happens that, across all of the devices where my Microsoft ID is linked, adding the replacement desktop PC caused me to exceed the 10 device limit for Windows Store apps and games. If you run into this situation, you can remove old devices from your Microsoft account by following the directions in this support article, in order to get under the limit of 10 devices on your account.
Clock out of sync
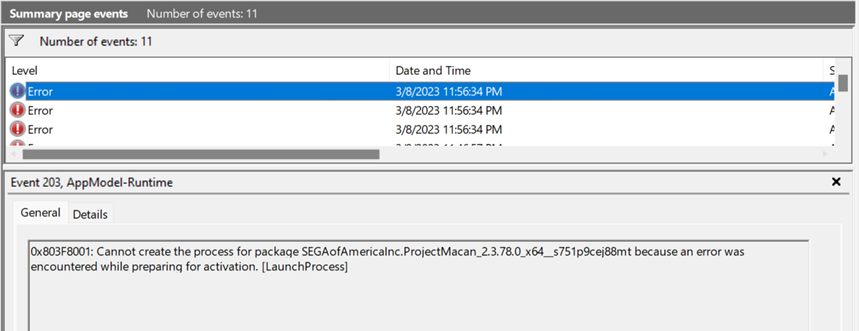
After I had resolved the problems above, I noticed that I was still having problems launching some apps and games that I had purchased from the store (such as the recently released Like a Dragon: Ishin!). Attempting to start these apps would result in them immediately shutting down, without even opening up a window or existing long enough for the process to show up in the task manager. I poked around in the Event Viewer in the Management Console, and noticed some interesting errors being emitted from the AppModel-Runtime source.

The event detail stated that there was an error that was encountered while it was activating the app:
Cannot create the process for package SEGAofAmericaInc.ProjectMacan_2.3.78.0_x64__s751p9cej88mt because an error was encountered while preparing for activation. [LaunchProcess]
I tried repairing the application packages, and resetting them (clearing local data), to no avail. I thought that perhaps there was something in the application packages themselves which was keyed similarly to Windows activation, so I deleted them and redownloaded them, but still had no luck running them – they failed in the same way. Then, finally, I noticed out of the corner of my eye that the system clock setting was incorrect – it was 2 hours ahead of Pacific time, almost certainly due to the time zone difference from the fulfillment center from which the replacement system was shipped. I know that DRM systems rely on clock times, so a problem with the clock could definitely cause problems with the DRM checks when starting up a game (which could be locked until its release date, and which relies on a timestamped, periodically-refreshed ticket to allow a user to run the application package) And sure enough, once I resynced the system clock to a public timeserver, everything worked without a hitch.
The most frustrating part of this was the lack of a user-facing error dialog on application startup, and the lack of a diagnostic error indicating that the clock might be the issue. I couldn’t find any other messages in the Event Viewer that would have suggested a clock issue. And when I did happen to notice that the system clock was in the future, I had to correlate that issue with the silent DRM failure myself, and I just so happened to have the right information to make it all make sense. I’m sure that many other people in this circumstance wouldn’t figure out what was going on.
Conclusion
After fixing the above issues, I was able to successfully use my old machine’s drives in its replacement, saving me a bunch of time and effort to reinstall things on the new machine. Hopefully my description of this experience is helpful, if you’re trying to do the same thing and running into problems!