Data Conditioning for Snowflake ID Compression

close up photography of snowflake
Photo by Egor Kamelev on Pexels.com

I was reminded recently of a question that had been in the back of my mind when I was working at Twitter. With the exception of very old content, IDs of tweets and other entities like users are so-called “snowflake IDs” – unique timestamped integer IDs, constructed specifically to try and avoid ID collisions in a high volume application. Snowflake IDs use a certain number of bits for the timestamp, some bits to identify the ID generator from which the value came, and a set of bits for a “sequence number”, to disambiguate IDs that are generated within the same timestamp.

If you have a set of IDs generated using this scheme, you might notice that, in practice, many of the bits have the same value across IDs. For example, there is a limited number of ID generator hosts in use – you might only see a handful of different values, in practice. Most of the ID generator bits in your IDs are going to match, or perhaps only a couple of them might vary at all. The sequence numbers demonstrate the same sort of concentration – most of the time, the sequence number will be 0, since it is rare to generate many IDs within the timestamp resolution, and that 0 across lots of IDs would compress very well. And even the timestamps themselves will have many common values across a block of IDs, given the limited time windows in which services that use these formats have been operating. There just seems to be a lot of commonality across ID values, inherent to the format itself.

The question that I had asked myself was, how much could you compress these ID values, if you performed a bitwise transpose on the ID values (like BitShuffle), before compressing them? And how would this compare to just naively compressing these blocks of IDs with something like Brotli? It seemed to me that, after transposing the ID values, you might end up with very long runs of bits that all have the same value, which would be a great target for compression algorithms.

I spent a little time writing an experimental harness in F# to allow me to test this idea, and collect data about the effectiveness of applying different filters or conditioning techniques on the data, before compressing it. As configured out of the box, it runs 5000 trials, generating 3200 IDs per trial and running them through each of a set of data processing pipelines. I’ve put the code up on GitHub, along with a spreadsheet with graphs illustrating the effectiveness of each method from a run I did locally.
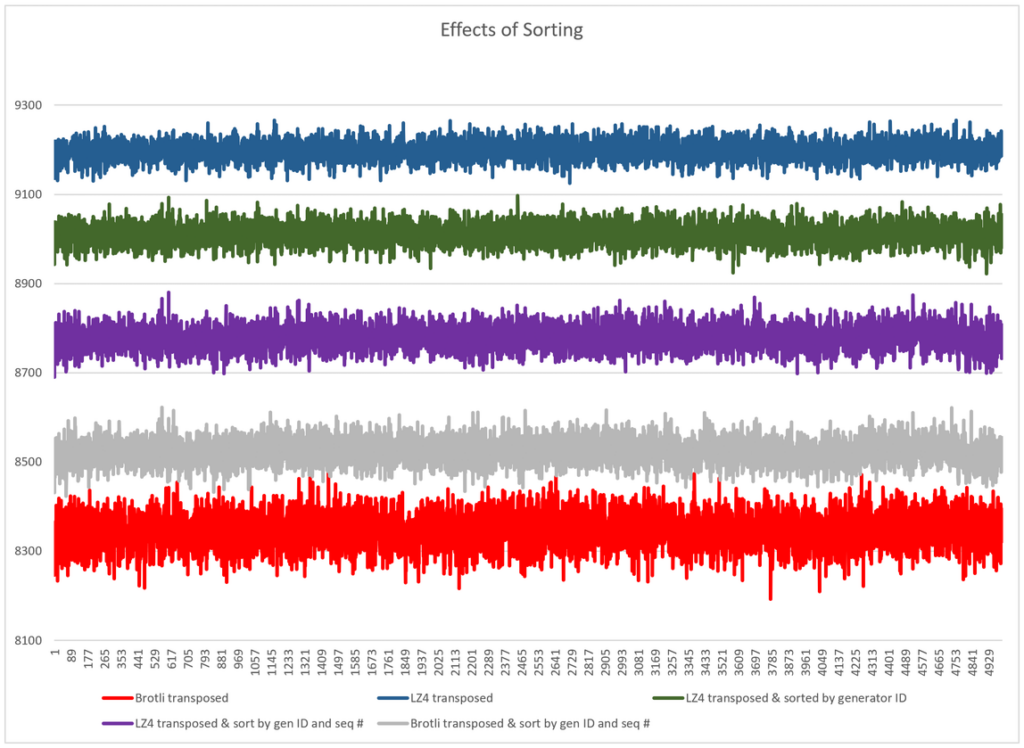
A quick summary of the results:

  • General-purpose compression algorithms like Brotli perform well when compressing this data, even without any other conditioning applied to it.
  • Performance-oriented algorithms like LZ4 produce significantly larger (60-100%) results than, say, Brotli, when no data conditioning is performed. Compared with uncompressed data, LZ4 compression without any further data conditioning only results in a ~35% space savings.
  • The bitwise transposition technique works well for the algorithms like Brotli, reducing the size of the final data by another 15% or so. But it makes a huge difference for LZ4 and the like, cutting the size of the final data by another 45% or so, and putting it within 10% of the size of Brotli-compressed data.
  • Grouping IDs by their generator ID and sequence numbers before applying the transpose results in another ~5% improvement in the final size of the LZ4-compressed data. As you can see in the graph above, this grouping change actually made Brotli compression significantly worse than with transposition alone, which is interesting.
  • There didn’t seem to be any significant difference in changing the sort direction of the IDs in the block.
  • Compared to the uncompressed data, “Brotli with transpose” reduced the size of the ID data by ~66%. “LZ4 with grouping and transpose” reduced the size of the ID data by ~65.7%.

These results suggest quite strongly that proper data conditioning before applying compression to snowflake IDs can result in pretty big space savings, on the order of ~66%. And if you’re using an algorithm like LZ4, you’ll definitely want to transpose your ID values before compression. If you have large sets of IDs like this in your system, either at rest, or as part of calls or messages in your system, it might be worth trying these techniques to reduce data size.

If you’re interested in playing around with the parameters of this test, you can easily tweak them in the source, and re-run it again locally. You can also try configuring your own data conditioning and compression pipeline, and compare it against the ones that are already there.

The Overseas Vote by Mail Experience: Finland and the Philippines

Santeri Viinamäki, CC BY-SA 4.0 https://creativecommons.org/licenses/by-sa/4.0, via Wikimedia Commons

I recently submitted my ballot for the upcoming Finnish parliamentary election, and in 2022, I had voted in the Philippine general elections. In both cases, I voted as an overseas voter, by mail. As one of the undoubtedly tiny number of people who has participated in both of these systems, I figured I should share my experiences and thoughts about each one!

Philippine Overseas Voting by Mail

In order to vote overseas as a citizen of the Philippines, you first have to register as an overseas voter, by visiting an embassy, consulate, or other approved registration center abroad. The registration basically consists of showing proof of citizenship – there isn’t anything complicated about it. You have the option of voting by mail or voting in person at authorized sites (like the aforementioned embassies and consulates). As long as you do not skip 2 elections in a row, or move to a different region, your voter registration remains active, and you do not need to re-register.

As an overseas mail voter, you receive your ballot from, and return your ballot to, the consulate in the region where you live. At those locations, it is then tabulated, under the scrutiny of accredited poll watchers and members of the media. There are online tools for mail voters to check whether or not their mail ballots were returned-to-sender, and overseas mail voters always have the option to vote in-person if it works better for them.

The ballot that you receive is similar to ones which I have used as a mail voter for elections here in the United States. (You can see what the ballot for each region of the country looks like, including the one for overseas voters, at this page.) In each section, you fill in the requisite number of bubbles in ink, to vote for your desired candidates. The ballot is then returned in a plain envelope to the local consulate, before the 30 day overseas voting period expires. It’s very straightforward and uncomplicated.

Turnout for overseas voters in the 2022 national elections, to my untrained eye, seems quite good. Approximately 1.7 million eligible registered overseas voters tallied around 660,000 votes, for a turnout rate of around 40%. In contrast, US overseas citizens had an estimated turnout rate of only 7.8% in the 2020 election.

Finnish Overseas Voting by Mail

Finnish overseas mail voters must order their ballots anew for each election. The registration, in this case, opened up roughly 3 months before the in-person election date. In theory, you have a roughly 30-day voting period to vote, but in practice, the window for voting is actually a lot shorter. The first reason is that ballots are mailed from Finland, starting 30 days before the election (when candidates and their ballot numbers are finalized), and it may take some time for them to reach you. Similarly, your ballot must be returned to your municipality of record in Finland, which could take quite some time to deliver, unless you opt for (expensive) international express delivery, on your own dime. I would estimate that this leaves a window of roughly a week, for an overseas voter to receive their ballot, decide how they are going to vote, and to send it back off to Finland to be recorded. That’s not a lot of time!

The ballot for the parliamentary election is comically simple. You only vote for a single candidate, from a list based on the electoral district of your municipality in Finland. Most districts have 100-250 candidates on the ballot, with Uusimaa tipping the scales at a whopping 485 candidates. So your ballot is literally a folded piece of paper, with a circle on it, where you write the candidate number of the person for whom you are voting. There is no machine-readable bubble form, showing candidate names – you simply copy the number from the candidate list, then seal your ballot inside a small blue envelope.

Once you have done that, then you need to fill out a form certifying the authenticity and validity of your ballot, which must be cosigned by two witnesses. (The witnesses cannot be a spouse, child, or parent of the voter – strangely, other familial relations appear to be OK. There is no requirement for the witnesses to be Finnish citizens.) The form, for which you need to manually write in the correct municipal election office address, then goes into another envelope, along with the blue ballot envelope. Drop it in the mail, and hope that you did it in time for it to get to Finland, before the voting deadline passes.

Overseas voters also have the option to vote at specific voting stations abroad, during a short early voting period.

The turnout numbers for the most recent parliamentary election in 2019 do not break out mail versus in-person votes for overseas voters, but the turnout rate for the ~250,000 eligible overseas voters stands at only 12.6% . This comes out to a little less than 32,000 votes.

Comparisons and Conclusions

Overall, the Philippine overseas voting experience was significantly more voter-friendly than the Finnish one, and I think this is reflected in the much higher turnout rate for overseas Filipinos. Using a pre-printed optical scan ballot, and using local, in-country embassies and consulates as the point of ballot distribution and collection, makes it a lot easier for voters to participate in elections. I suspect that the rules around keeping active overseas voter registrations valid, as long as you continue to participate, also promotes higher turnout, as there is less of an opportunity to forget to register and accidentally miss out on voting. The level of transparency and overall promotion of the process by COMELEC and the consulates abroad is commendable, and I will be happy to participate in elections again in the future.

Finnish elections, on the other hand, have some work to do to make overseas voter participation by mail easier. The witness requirements for postal ballots in Finland seems unhelpful and antiquated, and unlikely to improve election security in any meaningful way. The timeframe with which overseas voters wind up to complete their ballots is inadequate, and likely disenfranchises or discourages overseas voters who aren’t actively thinking about elections. It doesn’t seem feasible to extend the mail voter window, or start it earlier, though, without other changes to dates and deadlines in the electoral system, and I would be surprised if this was viewed as big enough of a problem to be worth addressing. In short, I’m pessimistic about the likelihood of big improvements to the current system.

From a practical perspective, the cost for Finland to implement some of the niceties of Philippine overseas voting is likely prohibitively high. Finland has sixfold fewer eligible overseas voters than the Philippines, and it also has a smaller worldwide consular footprint. But, considering that it already has a robust digital identity system for its citizens, supporting smartcard and other authenticated access to many government services (including proposing and voting for citizens’ initiatives), I would hope that authenticated electronic voting for overseas voters is in the works. (Estonia already allows online voting. And yes, I’m aware of many of the security concerns around online voting in general – but I am optimistic that transparency and verifiability concerns can be addressed, given sufficient motivation, effort, and scrutiny.) In the meantime, allowing overseas voters to remain opted-in to automatically receive mail ballots (as long as they are continuing to vote that way) is probably the best, lowest cost way to improve turnout. I will do my best to continue to participate in Finnish elections, but the friction in the current process will continue to irk me.

Swapping Drives After a PC Hardware Replacement

Late last year, I replaced my main desktop PC, after using it for just about 7 years – a pretty good run. I decided to just buy an off-the-shelf system from Dell, rather than build my own (which I have done many times in the past), since my current computing needs are not super unusual, and it didn’t seem like it would be worth spending the time to spec everything out and do all of my normal bargain hunting behavior for it. Even though I have several other usable computing devices around the house which could step in when necessary, I opted for the enhanced service contract on my new machine, thinking that, in the event that something did break, minimizing my downtime would be worth the expense.

Well, for once, something actually broke, when I purchased an extended warranty! After a couple of months of service, a fan on the computer started rattling intermittently. This is always an unnerving thing to hear, because you immediately think that your CPU or GPU is turning into a mini hot plate inside your case, and that a meltdown might be imminent. After popping the cover, inspecting and listening to all of the fans, and making sure that there was nothing rubbing up against any of the fans, I realized that the noise (which was becoming more frequent and louder) was coming from the fan enclosed in the power supply. Since the power supply is pretty much the one non-user serviceable part in the case, I relented and contacted support about getting a replacement for it. After doing the usual “I have investigated this and I’m not a total dummy” dance with technical support, they informed me that replacing just the power supply alone would be delayed for several weeks, as the part was backordered. However, they could ship me a replacement system much sooner than that – would I like to do that, instead? Sure, I guess! They shipped the replacement system via overnight shipping, and the next day, the box was sitting in my living room, waiting to be opened.


Source: File:Intel 512G M2 Solid State Drive.jpg – https://en.wikipedia.org David290, CC BY-SA 4.0, via Wikimedia Commons

Having used my new desktop for a couple of months, I had, naturally, already installed a bunch of things, and accumulated various stuff (not subject to cloud backups) which I would be loathe to simply throw away. If I had to reinstall and reconfigure things, I was probably looking at a couple of days of work before things were truly back to normal. Ideally, I would be able to just swap out the drives from my machine into the replacement, and go on my merry way, but I was wary about whether or not it would work that smoothly. I checked on the shipping invoice, and confirmed that they had sent a system with identical specs and hardware as my original PC, which was promising with regards to being able to just swap out the drives. (The warranty e-mails suggested that they would ship something that was equivalent or better, so I was curious as to whether or not I would get a free upgrade.) I decided to give it a shot, since if it didn’t work, I probably wouldn’t lose that much time compared to doing a full reinstall.

This PC Magazine article gave me some optimism that things would just work, especially since, as far as I could tell, the new hardware was identical to the old set. And it turns out that the drive swap was successful, but I did run into a couple of issues that had to be resolved, which I figured I would document here, in case anyone else on the Internet runs into something similar.

BitLocker Recovery Keys

My drives were encrypted with BitLocker drive encryption, with the key stored in the TPM on the computer. When I moved the drives to a new computer, without the keys in its TPM, I had to enter the appropriate recovery keys at boot time, in order to be able to use the drives. I had the keys backed up somewhere on network storage, but I found it easier to simply look them up on my phone, from my Microsoft account at aka.ms/myrecoverykey.

Reactivating Windows

Windows fingerprints your system’s hardware upon activation. Even though the hardware in the replacement system was the same, elements that are used in the system fingerprint such as its MAC address can change, resulting in the OS activation check failing. To reactivate using the same key as on your old system, you can follow the directions in this article.

Hitting the active device limit for the Windows Store

It just so happens that, across all of the devices where my Microsoft ID is linked, adding the replacement desktop PC caused me to exceed the 10 device limit for Windows Store apps and games. If you run into this situation, you can remove old devices from your Microsoft account by following the directions in this support article, in order to get under the limit of 10 devices on your account.

Clock out of sync

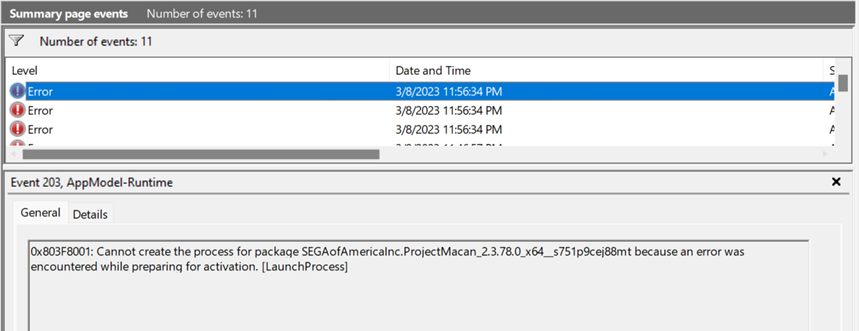
After I had resolved the problems above, I noticed that I was still having problems launching some apps and games that I had purchased from the store (such as the recently released Like a Dragon: Ishin!). Attempting to start these apps would result in them immediately shutting down, without even opening up a window or existing long enough for the process to show up in the task manager. I poked around in the Event Viewer in the Management Console, and noticed some interesting errors being emitted from the AppModel-Runtime source.


The event detail stated that there was an error that was encountered while it was activating the app:

Cannot create the process for package SEGAofAmericaInc.ProjectMacan_2.3.78.0_x64__s751p9cej88mt because an error was encountered while preparing for activation. [LaunchProcess]


I tried repairing the application packages, and resetting them (clearing local data), to no avail. I thought that perhaps there was something in the application packages themselves which was keyed similarly to Windows activation, so I deleted them and redownloaded them, but still had no luck running them – they failed in the same way. Then, finally, I noticed out of the corner of my eye that the system clock setting was incorrect – it was 2 hours ahead of Pacific time, almost certainly due to the time zone difference from the fulfillment center from which the replacement system was shipped. I know that DRM systems rely on clock times, so a problem with the clock could definitely cause problems with the DRM checks when starting up a game (which could be locked until its release date, and which relies on a timestamped, periodically-refreshed ticket to allow a user to run the application package) And sure enough, once I resynced the system clock to a public timeserver, everything worked without a hitch.

The most frustrating part of this was the lack of a user-facing error dialog on application startup, and the lack of a diagnostic error indicating that the clock might be the issue. I couldn’t find any other messages in the Event Viewer that would have suggested a clock issue. And when I did happen to notice that the system clock was in the future, I had to correlate that issue with the silent DRM failure myself, and I just so happened to have the right information to make it all make sense. I’m sure that many other people in this circumstance wouldn’t figure out what was going on.

Conclusion

After fixing the above issues, I was able to successfully use my old machine’s drives in its replacement, saving me a bunch of time and effort to reinstall things on the new machine. Hopefully my description of this experience is helpful, if you’re trying to do the same thing and running into problems!

Upgrading the Wireless Adapter of a Dell XPS 8900

Because it was kind of difficult to find information about this, I figured I would post some details about a tiny little upgrade that I did to a Dell XPS 8900. It originally came with a Dell DW-1801 wireless adapter, which only supports 802.11 b/g/n, and not ac. Also, it doesn’t support the 5 GHz frequency, which is really unfortunate.

All of this means that wireless performance is kind of shaky upstairs in our house. I had started researching Wi-Fi extenders, and then went to check to see exactly what 802.11 ac profiles our router and wireless adapters supported, and was shocked when I realized what the problem was. I remembered that our XPS 8900s came with integrated wireless, and I seemed to remember that it was an M.2 device, so I looked to see if I could just swap out the wireless card with something better.

Amazingly, in spite of all of the exhaustive specification information you can find on the Internet, it was actually pretty hard to figure out what M.2 physical connector the existing DW-1801 card used. I tried looking through my system and service manuals, and wasn’t able to find that information anywhere. This thread on Dell’s support forums was the best source of information I found, and indicated that it is size 2230 with key A E.

I looked around to find a replacement adapter, and ultimately opted for this Intel 8260 NGWMG that I found on Newegg. Before installing, I went ahead and downloaded and installed the drivers from Intel. The physical installation was pretty straightforward, once I found the correct screwdriver to take off the old adapter and antenna wires. On bootup in Windows 10, the adapter was recognized and it started working perfectly once I rejoined the network.

So, yeah, for curious people on the Internet – you can, in fact, upgrade the wireless adapter in a Dell XPS 8900 with a third party M.2 card.

Ludum Linguarum: Aurora

(Ludum Linguarum is an open source project that I recently started, and whose creation I’ve been documenting in a series of posts. Its purpose is to let you pull localized content from games, and make flash cards for learning another language. It can be found on GitHub.)

In this post, I’ll talk a little bit about Ludum Linguarum’s support for some of the Aurora-engine based games that are out there. The Aurora engine was Bioware’s evolution of its earlier Infinity Engine, and was used in quite a few games overall.

Motivation

There are quite a few games with large amounts of text that were produced with the Aurora engine (including one that I worked on), so it seems quite natural to try and target it for extraction. The text in these games can also be categorized in some ways that I think are interesting, in the context of language learning – there are really short snippets or words (item names, spell names, skill names, etc.), as well as really lengthy bits of dialogue that might be good translation exercises. Additionally, there’s quite a bit of official and unofficial documentation out there around its file formats.

Goals for Extraction

The raw strings for the game are (mostly) located inside the talk table files. However, just extracting the talk tables would lose all context around how the strings are actually used in the game. For example, the spell names, feat names, creature names, dialogues, and so on, are all jumbled together in the talk table. It sounds like a small thing, but I feel that creating a taxonomy (in the form of “lessons”) would make a big difference in the usefulness of the end product. Unfortunately, it also makes a huge difference in the amount of effort needed to extract all of this data!

How it all went

I spent quite a bit of time writing file-format-specific code, for things like the TLK table format, the BIF and KEY packed resource formats, the ERF archive format, and the generic GFF format. On top of that, then there was code to deal with the dialogue format that gets serialized into a GFF.

I started with the original Neverwinter Nights, and then moved on to Jade Empire. The console-based Aurora engine games used some variant file formats (binary 2DAs, RIM files, etc.) that needed a little extra work to deal with, but there was enough information about these available on the Internet that I was able to support them without too much hassle.

Once I had the basic file parsing code in place, it was just a matter of constructing the “recipe” of how to extract the game strings. This mostly involved sifting through all of the 2DA files for each game, looking for columns that represented “string refs” (i.e. keys into the talk table database) – extracting dialogues was much simpler since they were already in their own files, and their contents were unambiguous.

Comparison between C# and F# implementations

I had basically written all of this file parsing code before (in the C# 2.0 era, so without LINQ), but this time around I was writing it with F#. I found it very interesting to compare the process of writing the new implementation, with what I remember from working on Neverwinter Nights 2 more than 10 years ago.

The F# code is a lot more concise – I would estimate on the order of 5-7x. It isn’t quite an apples-to-apples comparison with what I did earlier (for example, serialization is not supported, only deserializataion), but it’s still much, much smaller. I suspect that adding serialization support wouldn’t be a huge amount of additional code, for what it’s worth.

Record types and list comprehensions really help condense a lot of the boilerplate code involved in supporting a new file format, and match expressions are both more compact, and safer when dealing with enumerated types and other sets of conditional expressions. I also got lots of good usage out of Option types, particularly within the 2DA handling, where it very neatly encapsulated default cell functionality.

But I think the thing that accounts for the biggest difference between my old C# implementation and the new F# implementation, is the range of functional abstract data types available – or, to put it another way, the lack of LINQ in my C# implementation. If LINQ were available at the time I was working on Neverwinter Nights 2, I think my code would have looked a lot more like the F# version, with liberal use of Select()/map() and Where()/filter(). These operations replace very verbose blocks of object construction and selective copying, often in a single line, which is an enormous savings in code size and improvement in clarity.

I feel like there is still a lot of bespoke logic involved, for extracting the individual bits and pieces of each format, but that doesn’t seem to be avoidable – the formats are not self-describing, and it seemed like it would be overkill to try and construct a meta-definition of the GFF-based formats.

Summary

Overall, I was pretty pleased with how this went. While it was a decent amount of work to support each file format, once that code was all written, the process of creating the game-specific recipe to extract strings was pretty straightforward. There weren’t really any surprises in the implementation process, which was definitely not the case for the game that I’ll talk about in my next set of posts.

Ludum Linguarum: The Simple Stuff

(Ludum Linguarum is an open source project that I recently started, and whose creation I’ve been documenting in a series of posts. Its purpose is to let you pull localized content from games, and make flash cards for learning another language. It can be found on GitHub.)

When I started this project, I figured that support for individual games would fall into one of a small set of categories:

  • Low effort, where the strings are either in a simple text file or some sort of well-structured file format like XML, where many good tools already exist to pull it apart.
  • Cases where the file formats, while bespoke, are well documented, and where there may be tools and code that already exist to parse the file formats.
  • The really hard cases – ones where there isn’t a lot of (or any) extant information about how the game stores its resources, and extracting strings and metadata about them is more of a reverse-engineering exercise than anything else.

In this post, I’ll talk very quickly about a few really simple examples of games that I was able to knock out very quickly: King of Fighters ‘98, King of Fighters 2002, Magical Drop V, and Skulls of the Shogun.

King of Fighters ‘98 and King of Fighters 2002

While I was working on this project, I started on some of the other supported games first. But then, I decided to take a little break, and see if there were any games out there that would be really trivial to support. I just started browsing through my Steam library, and realized that fighting games were probably a good candidate – they contain limited amounts of text, but were definitely globalized.

Both of these games use the Xbox 360 XDK’s XUI library formats to present their UI. (I determined this by the presence of some files and directories with “xui” in their name.) All of the strings in the game are inside a file conveniently named strings.txt inside the data directory.

This is a tab-delimited format with just four columns – a key for the string, a “category” comment field, and then columns for each supported language – “en” for English, and “jp” for Japan. (It’s interesting that the country code rather than the language code was used for Japan – I’m not sure if that was an unintentional mistake.)

In this case, it’s super simple to extract all of the strings, because of the simple formatting, and the one place that I need to look to find them all. I simply read in the file, and directly map the key column to the per-language text for each card.

(It’s worth noting that King of Fighters XIII doesn’t use the same format or engine, so I wasn’t able to just add support for it using the same code.)

Magical Drop V

Adding support for Magical Drop V just involved reading some XML files within its localization subdirectory, and massaging them slightly to remove invalid and undesirable text. For example, ampersands were not escaped in the XML files, which caused the .NET framework’s XML parser to complain. I also stripped out some obvious placeholder values (“<string placeholder>”).

Overall, it was really quite simple to add support for this game, with the game-specific code only running to about 50 lines.

Skulls of the Shogun

Skulls of the Shogun is a game built on XNA and MonoGame, and actually uses the .NET framework’s globalization support to localize its strings. Thus, I was able to use the framework’s support for loading satellite assemblies to pull out both the string keys used to refer to the strings, as well as the content itself, quite easily.

I actually spent more time determining that I had to load the assemblies using the reflection-only context, in order to keep my library and console application bit-length-independent, than writing the rest of the code to support this game!

Ludum Linguarum: The Tools

(Ludum Linguarum is an open source project that I recently started, and whose creation I’ve been documenting in a series of posts. Its purpose is to let you pull localized content from games, and make flash cards for learning another language. It can be found on GitHub.)

When I started working on Ludum Linguarum, I decided to use it as an opportunity to exercise what I had been learning about the F# language on the side. This might seem like kind of a strange decision out of context, but there were a few reasons why I felt that this made sense:

  • I already had a good bit of familiarity with the .NET stack, having spent a good chunk of my years in the gaming industry writing tools in C#.
  • Because of the frequent use of C# in games and editors, I felt that there would be a greater likelihood of me finding useful, easy-to-integrate libraries and documentation for reverse engineering games than on other stacks.
  • I write Scala at my day job, so I figured that I would be reasonably well-equipped to deal with the functional programming aspects of the language, even if I had never really touched Ocaml before.

At the very beginning of the project, I was working on learning F# on my commute, using Mono and MonoDevelop on an old netbook that I threw Ubuntu on. This worked (in that it is totally possible and viable to write F# and .NET code on non-Windows platforms), but later on I got a proper new laptop, threw Visual Studio 2015 on it, and never looked back. The added benefit of doing this, of course, was that, running under Windows, I could easily install and run the games that I was reverse engineering.

The benefits

All in all, I have been very pleased with my decision to use F#. Using a functional-first language let me construct composable, easily-testable pipelines, and I feel this really saved me a bunch of time as the project grew. The language is very similar in capabilities to Scala for application code, albeit with significantly different syntax and a slight verbosity tax.

When I think back to similar code I’ve written in the past, I feel that my F# code is more concise, easier to understand, and with less room for bugs to creep in, compared to C++ and C#. This applies both for simple parts of the code, as well as much more complex parts. In a future post, I’ll go into this in some more detail.

I would go so far as to say that the things that slowed me down the most were when I strayed furthest from the functional style, and just used the full console application and the full game data as my testbed. (The reason I did this is that it can be a bit of a pain to construct test data that is compact, concise, and doesn’t include any actual copyrighted material.) As long as I wasn’t too eager, moved at a reasonable pace, and built up a decent test corpus, things worked out well.

Project setup

Initially, I used the standard .fsproj and solution setup in VS. The project was set up as a plugin-based system, where all main build outputs were copied into a single output directory, and NUnit test projects were simply run in-place. This worked OK, but as I got closer to actually releasing the first version of the project, I decided that it would be better to migrate the project to the FAKE build system and Paket dependency manager. (Using those makes it simpler to keep dependencies up-to-date, and hopefully easier for the curious or motivated to build and run the project.)

I used the open source F# Project Scaffold, and reconstructed my old project setup. It took a little bit of experimentation, but I was able to get up and running pretty quickly. I did run into an issue where the recently-released NUnit 3 isn’t supported by FAKE, and I did have to do some legwork to get everything building with F# 4 and .NET framework 4.6.1, but it wasn’t too bad. Now I have a very simple system to build, test, and package the project for release.

The latter is particularly important – I don’t have a lot of extra time to spend on overhead like manually making builds and uploading them, so it’s much easier for me to change the way I work, and change my project to conform to some existing conventions. One example of this is that the console program used to have no project dependencies on its plugins – they were copied as a post-build step into a separate plugins directory in the build output. This was done out of a bit of a purist mindset (and was what I had done on some other projects in the past) – but when I migrated to FAKE, this presented some problems, as it was difficult to duplicate this exact behavior. The solution was to simply abandon purity, adjust the way that I did things, and just add project dependencies to the console application against the plugins. Realistically speaking, anyone developing a plugin is probably going to have the full source handy anyway, so why get hung up on this?

Other libraries

So far, I’ve pulled in just a few other libraries. One is sqlite-net, a SQLite wrapper, and another is CommandLineParser, to allow me to construct verb-driven command line handling in the console application. I spent a little while wrestling with both, but now I have a couple of wrappers and things generally set up in a way that works well. (I actually switched back and forth between the old version of CommandLineParser and the new beta one, and wound up sticking with the new beta as it fixed at least one annoying crash relating to help text rendering when using verbs.) I also wound up adding the venerable SharpZipLib library for zip archive support.

Summary

In summary, I’m glad that I have a setup now, using FAKE and Paket via the F# project scaffold, which is good for rapid development in Visual Studio, has good testing support, and one-line release packaging and deployment. There were a few bumps along the way in arriving at this setup, but I can wholeheartedly recommend it to anyone working in this ecosystem.

Introducing Ludum Linguarum

I’ve been working on a side project for some time now, and it’s gotten far enough along that it’s worth releasing it, and discussing it. It’s called Ludum Linguarum (LL) – a little awkward, yeah, but I figured that a unique name would be better in this case than spending a lot of time trying to find an available-yet-expressive one.

What does it do?

Well, it’s intended to be a tool for extracting localized resources from games, and then converting them into language learning resources. In other words, the end goal is that you can turn your Steam library (full of games that you bought for $0.99 in some random bundle) into material to help you learn another language.

The current version pulls strings from games, and turns them into flash cards for use with Anki (and compatible apps). LL supports 21 games right now, and the goal is to expand that over time.

Why write something like this?

Well, it involves two things that have always interested me (games and languages), and as far as I know, nothing else like this exists! (subs2srs is a tool in a similar vein, but it generates flash cards from subtitled videos instead.) I figure you might be able to get a little extra motivation and drive by learning another language in the context of gaming.

Another reason is that the vocabulary of games is often well off the beaten path of most language courses – I don’t think that Rosetta Stone or even Duolingo is going to tell you that “magic missile” is Zauberfaust in German. There aren’t that many opportunities to learn this stuff otherwise – think of it like professional vocabulary, but for a really weird job.

I also find cultural differences interesting, and that includes the way that game content gets translated. Seeing how colloquialisms and “realistic” conversation get translated is really interesting to me – I get a huge kick out of learning that platt wie Flundern is how someone chose to translate “flat as a pancake.”

Finally, game content in itself is an interesting treasure trove where you can often see the remnants of things that were tried and abandoned, or cut in order to get the product to the finish line. And naturally, some of the most common types of remnants are text and audio.

Next Posts

I’m going to spend the next few posts talking about the development of Ludum Linguarum, and writing the code to extract strings out of the first few games it supports. There were quite a few interesting problems that came up while getting to this point, and a few interesting tidbits and trivia that I can share about some of the supported games.

Open Live Writer

This is just a test post to try out Open Live Writer on my blog. I used to use the old Live Writer a bit, and was glad to hear that it had recently been open sourced.

So why am I all of a sudden interested in blogging again? Well, I have a few articles that I’d like to write, relating to a little side project that I’ve been working on, and I really like the WYSIWYG and native-client feel of Live Writer versus the WordPress admin UI.

Stay tuned! Open-mouthed smile

Compacting a VHD

I was looking to back up some VHD containers that I use to store files in Windows, and needed to trim one of them down before it would fit under the OneDrive 10 GB upload limit. Since it was a dynamically expanding VHD, just removing files from the container wasn’t sufficient to reduce the actual size of the VHD file. Once I was done, I needed to unmount the drive, and then compact it using the diskpart utility. Here are the steps I followed:

  1. Run the diskpart command from a command prompt.
  2. Enter select vdisk file="path to VHD file".
  3. Enter attach vdisk readonly.
  4. Enter compact vdisk. This will compact the VHD file, and might take a little while.
  5. Finally, enter detach vdisk and then exit. This will detach the VHD file and exit diskpart.

Once this is done, your VHD size should be reduced to the minimum necessary to store the files within!